Using Santali Lightroom Presets is the best way to make your simple photos look professional and colorful. Many people spend a lot of time on editing. But they still cannot find the right colors for their photos. Many people waste hours on editing. Still, the photo looks very dark or the colors do not look good at all.
But do not worry because today I have brought these presets for you. You can edit your photos very easily with these. If you use this small copy and paste trick, the look of your photo will change completely. It is so easy that even a small child can do it after watching it once.
What is Lightroom
Lightroom is like a magic application. Just like we use different things to decorate our house, the Lightroom app is used to decorate photos. This is a great app from Adobe company. You can use it on both mobile and computer. When I first started editing, I was very surprised to see this app.
There are many small buttons inside this app that help to fix the light and color of the photo. But it can be a bit hard for new people to learn the work of these buttons. But the most fun thing about Lightroom is that you can use presets. We will talk about these magic settings in the next paragraph.
You can use the Lightroom app very easily because its interface is very clean. When I started editing photos, I used to think it would be great if there was something that could fix everything in one click. And the solution to that problem is our special preset today. Let us find out what these presets are.
What are Santali Lightroom Presets
Many of you might be looking for Santali Lightroom Presets or lightroom preset santali. Actually, these are pre made color settings. For example, I worked very hard on one of my photos to give it a beautiful blue or green color. I saved those settings in a file that you can use on your photos.
These lightroom santali preset files are made specially keeping our culture in mind. The beautiful nature we have in our photo backgrounds becomes more bright and attractive with these mobile lightroom presets. This is like a gift for those who do not know editing at all.
Actually, it is very hard to find the best lightroom presets. I found them after a lot of searching and used my own experience to make these presets. When you use these lightroom presets free or adobe lightroom presets on your mobile, you will see that you look much brighter even in simple clothes. Next we will see how the magic of this one click editing works.
The Magic of 1-Click Editing for Santali Photos
Now we will know how your photo editing will be done in just one click. Many people think that photo editing is a very big thing and they need to study a lot. But I am telling you that if you have the right presets for lightroom, your work will be as easy as water.
This magic is the copy and paste settings. When I first learned this method, I could not believe that it is possible to edit photos so easily. Just take the settings from one photo and put them on your photo. Your experience of using lightroom mobile presets will change after this.
The benefit of this one click editing is that it will save you a lot of time. You can edit many photos together in a very short time if you want. Many people want to know how to use this on mobile. Right after this, I am explaining step by step how to add these settings to your mobile.
How to Add and Use These Presets on Your Mobile
First you have to install the Lightroom application on your mobile. You will get it from the play store and if you are an iphone user then you will get it very easily in the app store. Go there and search for Lightroom and the app will appear.
Then open the application. And here you create an account with your gmail id. It is very important to create an account because your settings are saved in it. When I wanted to use it without an account for the first time, I had many problems, so you should not make this mistake.
Then whenever you open the application, you will see a blue colored button at the bottom. There will be some options like camera and gallery. From there you add the photo you want to edit from your gallery and also add today’s lightroom preset that we provided.
Then open today’s lightroom preset. And click on the 3 dots option at the top and do Copy Settings. By doing this, all the colors of the preset will be copied to you. After this, you will see the real fun of your editing.
After that, you will see 3 dots on the photo you want to edit and go there and do Paste Settings. By doing this, your photo will be ready in just one click. Your whole photo will change in a moment just like the professionals.
This small method will help you edit your photo in a very short time in just one click. You can customize it as you like. If you think you want to change colors or increase light or decrease contrast, you can adjust everything. Let us now look at some special qualities of this preset.
Key Features of the Santali Preset
There are some features in our preset that will make your photo more beautiful. I have arranged these for you with a lot of care. The features are given below.
- Full HD Quality
- Free to use
- Comfortable in mobile and PC
- No Watermark
- Premium preset
- Vibrant Colors
- Soft Skin Tone
- One tap Adjustment
Because of these features, the quality of your photo will not decrease at all. Instead, the photo will look much cleaner. Next we will talk about the difference between the photo before and after editing.
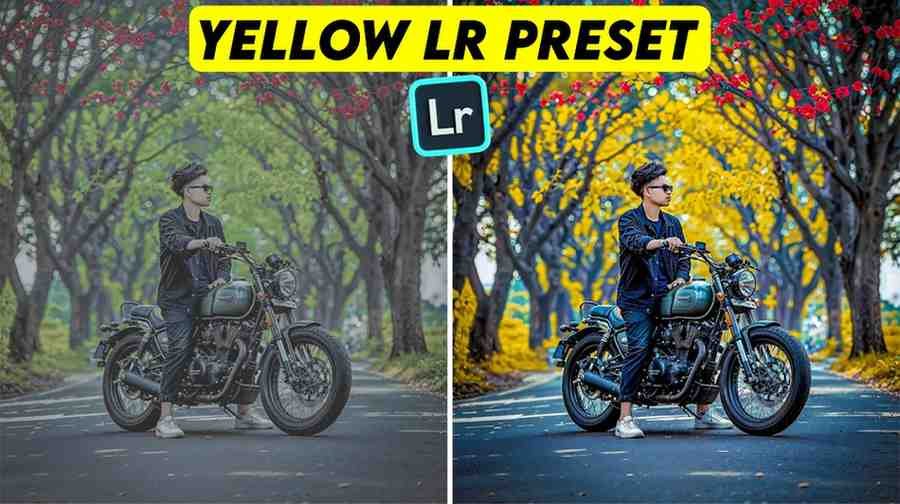
Before vs. After Real Transformation Results
Before editing, photos often look dull or dark. Maybe the color of the sky did not come out right or your skin color looks a bit dark. When I used to take my own photos, they did not look good at all if there was less sunlight. And that is when the magic of this preset starts working.
After editing, you will see that the green trees or the blue color of the sky in the background have become very alive. Every detail of your photo will come out very beautifully. After doing paste settings in one click, you will not be able to recognize your own photo.
Your mind will feel good after seeing this change. This change is very necessary for those who love to upload photos on social media. Because everyone likes to see beautiful photos. But even after using presets, some small tasks remain which we will learn in the next part.


Pro Tips How to Adjust Presets for Perfect Results
The light and color of all photos are not the same. Some photos might be taken in the afternoon and some in the evening. So if you see that the photo has become too bright or looks very dark after pasting the preset, there is nothing to worry about. You can change some settings manually.
I give you a small tip. If you see that there is too much light, go to the Light option in Lightroom and decrease the Exposure a little. And if you see that the color looks too strong, go to the Color option and decrease the Saturation a little. These small changes will make your photo perfect.
When I first started editing, I used to just put the preset and leave it. Later I understood that a little touch of my own hand makes the photo look more original. So decrease or increase the light or color a little according to the need of your photo. Now we come to the most important thing, how you will collect this preset.
How to Get Access to the Santali Preset
It is very easy to get this lightroom preset. I am telling you in full detail. Because no one else will tell you this. If you have come after reading the whole article and did not get this lightroom preset today, then all your time will be wasted. I do not want your time to be wasted.
To get the presets, you can see the photo of the preset below. Do not save this as a preset. Because this has been used only to show you so that you can understand which preset we are talking about. To get the original preset, you have to go a little further down.
Below that you will find a button and by clicking that button you can save this preset in your mobile. It is easy, is it not? You do not have to go anywhere else; you will find it on my website. Find the button and click it and start your editing.

My own experience and some words
When I started learning photo editing, I did not have a good camera. I used to take photos with a simple mobile and think how big editors make such beautiful photos. I used to watch videos on YouTube for hours but the result was zero. Many times it was seen that I went to make blue color and ruined the whole photo.
I faced the most problem in fixing people’s skin tone. Sometimes the face became too white and sometimes too red. While looking for the solution to this problem, I learned to make these presets. I failed many times and I wanted to leave editing many times. But I did not give up.
I learned it myself and from that experience I have made these Santali Lightroom Presets easy for you today. So that any of my younger brothers or sisters do not have to waste time day after day like me. Today I am very happy that I can share my knowledge with you. I hope these presets will be of great use to you and your photos will become wonderful.
Conclusion
In today’s article, we learned how to edit photos very easily using Santali Lightroom Presets. We discussed many details of lightroom mobile presets and best lightroom presets. Photo editing is not a difficult task anymore, just copy and paste and you can become a master editor. I hope you have learned something new.
Frequently Asked Questions (FAQ)
Is Lightroom app free to use?
Yes, you can use the Lightroom app for free from the play store.
Do these presets work on all photos?
Yes, these work on all types of photos but you might need a little adjustment according to the light of the photo.
How to copy lightroom presets?
By opening the preset and clicking on the three dots option at the top, you will find the copy settings option.
Can I use these presets on iPhone?
Yes, the Lightroom app is available in the app store of iPhone and the method works in the same way there too.
Does pasting presets reduce photo quality?
Not at all, rather it helps to make your photo colors and details better.