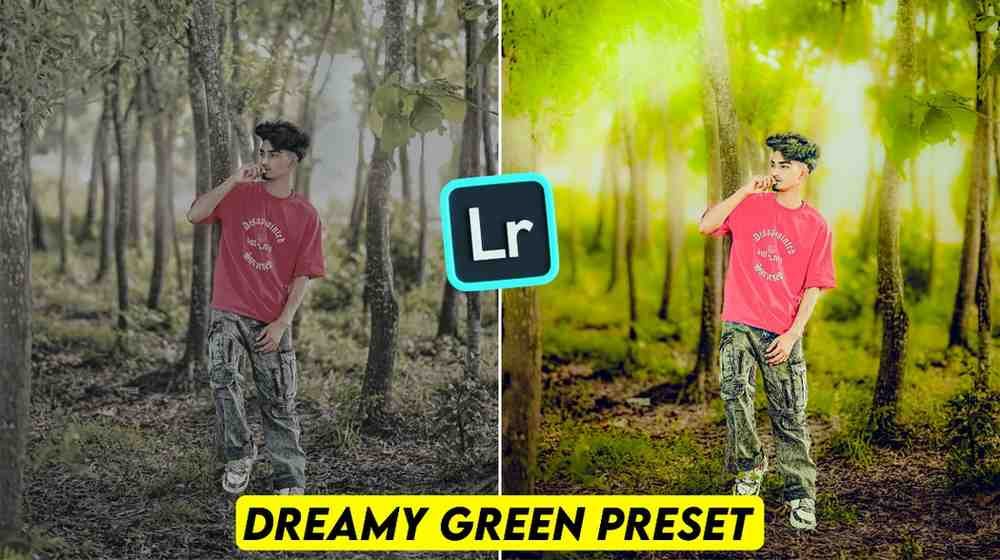
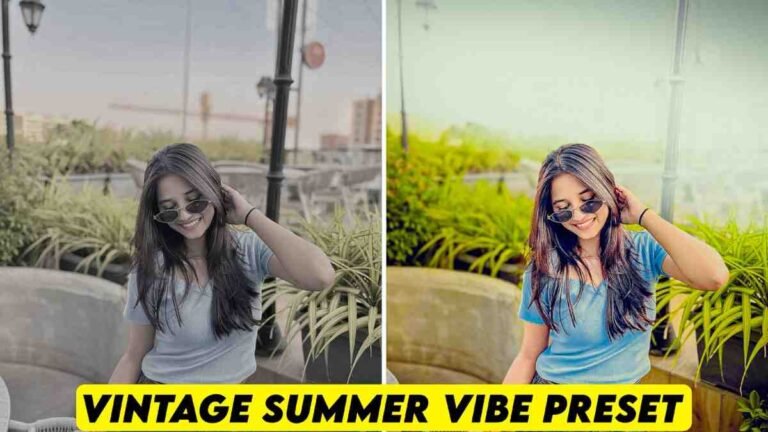
Dreamy Green Lightroom Presets Viral Edit: Are you bored with your simple photos. No matter what your background color is, you can give your photos a professional look using these dreamy green lightroom presets.
Many times we take photos in great places. But the real beauty does not come out in the camera. The color of the leaves or trees looks pale.
It makes you feel sad, right. It feels like the photo you took with so much hard work is ruined. Who likes to upload such dull photos on social media.
Do not worry, I have brought the solution to your problem today. I will teach you a small magic trick today.
A photographer friend of mine gave me a great thing. I have benefited a lot by using it. No matter how the background is, now it gets a magical green look in a moment.
Today we will discuss how you can easily give a new life to your photos. I have been doing photo editing for more than ten years.
I have found the best way for you from my long experience. So let us go to the main topic without delay.
Color grading is a big thing in the world of photo editing. The right color can change the whole story of your photo. Many people face problems while doing this work. Hours of time are wasted. But those who are smart look for another way. I also worked hard in the beginning. But later I understood that smart work is more important. This lightroom presets green is that smart solution.
It will do your hours of work in a few seconds. Not only that, the photo quality will also be very good. This is a great tool for those who are learning new work. Because understanding the balance of colors is a bit difficult at the start. If you use this tool, you will feel like the look of the photo changed by some magic. Just like professional editors.

What Are Lightroom Presets
To put it simply, a preset is a package of some settings made before. Suppose you mixed light, shadow, and color perfectly in a photo. Now you saved that whole work inside a file. This saved file is the preset. Next time when you edit another photo, you will not have to arrange everything again.
Just putting that saved file on the photo will do the job. For those of you who are looking for green preset lightroom, it is a blessing. Because making a perfect balance of green color is a very hard task. If it goes a little here or there, the real fun of the photo is ruined. So using these ready settings will save your time and the photo will also look very beautiful.


How to import presets on Desktop and Mobile
Now the question is, how will you bring this magic stick to your device. Do not worry, the work is as simple as water. Whether it is a computer or a mobile, I am telling you everything step by step. So that even someone very new can do it. Just listen to my words carefully.
Desktop
First, open the Lightroom software on your computer. On the left side, you will see a panel named Presets. You will see a small plus icon there. Click on that and choose the Import Presets option. Now select that zip file from your computer which you have Saved. That is it, work is finished.
Your forest green lightroom preset is now ready to use. Now you can open any photo and see the magic by clicking once on your favorite setting from that panel on the left. The matter is very easy, right.
Mobile
The work on mobile is even easier. Nowadays dark green presets lightroom mobile is on everyone’s phone. First, add your saved DNG file in the Lightroom app like a photo from the gallery. Open the photo and click on the three dots at the top right.
From there, choose the Create Preset option and save it with a name. After that, when you open any of your own photos and go to the preset option at the bottom, you will see your saved preset. That is it, the look of your photo will change with one tap. It is a very simple process like water.

How to Use Dreamy Green Lightroom Presets
When the talk comes about how will I use dreamy green lightroom presets. It can be any preset like red, green, blue, or cinematic. The rule is almost the same for everything. First, you have to install the Lightroom application on your mobile. You will get it from the Play Store. And if you are an iPhone user, then you will get it very easily from the App Store.
Then open the application. And here you will make an account with your Gmail ID. As soon as you open the application, you will see a blue button at the bottom. There will be options for camera or gallery. From there, you will add the photo you want to edit from the gallery. Along with that, you will add our given Lightroom preset photo of today.
Then open our given preset photo. Click on the three dot option at the top and do Copy Settings. After that, you will see three dots on the photo you want to edit. Go there and do Paste Settings. Your photo will be ready in just one click by doing this.
That is it, your photo will be ready in a very short time by using this small method. You can customize it as you like. If you feel that you will change color somewhere, increase light, or decrease contrast, you can adjust everything.
Getting this Lightroom preset is very easy. I am telling you in detail. Because no one else will tell you this. If you have come after reading the whole article, then if you do not get this preset today, then all your time went to waste.
To get the preset, you can see a picture of the preset below. Do not save it thinking it is the preset. Because it has been used only for the purpose of showing you as a demo. Below it you will find a button. You can save this preset on your mobile by clicking that button. Easy, right.

Why Every Editor Needs Dreamy Green Lightroom Presets
For those who want a professional look, it cannot be said enough how important green tone lightroom preset is. A different life comes into the photo. Let us see why you need it.
- Full HD Quality
- Free to use
- Comfortable in mobile and PC
- No Watermark
- Premium color grading
- Easy one click edit
- Time saving for bulk editing
- Safe and secure file
- Natural skin tone protection
- AND ADD MANY MORE
Some Experiences of My Editing Life
When I first came to this field, I had no idea about editing. My sweat would literally run off while trying to make the background of a photo green. Sometimes the skin color would become green, and sometimes the color of the trees around would become blue. It took hours of time to edit each photo. Sometimes I felt like, leave it, I cannot do this.
But I did not give up. After that, I got this moody green lightroom preset from that photographer friend of mine. At first, I could not believe that such beautiful work happens in one click. I saw that using this keeps the skin tone of people perfectly fine, only the background color gets a magical look.
From then, my way of working has changed. I want you to learn this easy way too. There is no need to sit in front of the screen for hours and hours. Work in a smart way, you will see everyone is praising your editing.

Conclusion
I hope you could learn many things from todays discussion. These dreamy green lightroom presets will be very useful for you. Your photos will not be dull from now on.
There is no more worry for you about dark green lightroom preset or green portrait presets lightroom. I have tried to present the whole matter to you very simply. If you get even a little help by reading this article, then I will understand that you really learned something new today and my writing is successful.
How do I use presets on mobile?
Work will be done by doing copy settings from the preset photo and doing paste settings on your own photo.
Will this preset work on iPhone?
Yes, if you have the Lightroom app, this preset will work very well on both Android and iPhone.
Does using presets reduce photo quality?
No, using the right preset does not reduce photo quality, rather it looks more professional and beautiful.
What is a Lightroom preset?
A Lightroom preset is a set of color and light settings saved before which can be used on a photo in one click.